FastAPI on AWS Lambda with Docker
Hosting a FastAPI on AWS Lambda using Docker Containers is a process you never knew you needed. This tutorial will go over the full process.
The Backstory
Have you ever created a new FastAPI but are worried about the upfront cost of hosting it? I certainly have! Maybe, like me, you even thought Fargate would be a cheap alternative to simply using EC2 only to realize that something as simple as a Load Balancer could cost up to $15 per month. Not only that, perhaps you also considered just giving in and deploying on EC2 only to realize you’re looking at a difficult-to-scale (without paying extra for load balancers) system where you would still be paying $3 per month (at a minimum) regardless of the traffic (and not including any extra costs). That certainly doesn’t sound like the “server-less” dream we’ve been sold where compute is cheap and easy to set up.
Then I found AWS Lambda. It sounded like the solution to all of my problems. From a massive free tier to the ability to only pay for exactly what you use, AWS Lambda felt like a perfect solution. That is, all except for one thing: I was working with a custom Docker environment that was absolutely necessary for my project, and creating a non-AWS Docker image was a little daunting for a newcomer to the AWS environment.
So, I decided to not only jump down the rabbit hole of creating a non-AWS Docker image CI/CD pipeline for AWS Lambda but also create a whole blog to share my solution since I spent so many hours struggling to understand every part of this process. Here is the result!
Is this right for you?
Before we begin, I think it is extremely worth noting that this may not be the right solution for you. To find out if this is the right solution for you, I’m going to lay out a couple of important requirements that I needed for my solution.
First, I was in need of a custom docker environment. It was not enough to install packages using pip. I needed control over the actual OS. If you are simply looking to run a FastAPI on AWS Lambda, this solution may answer your question but there may be more concise or specific tutorials for you out there. For example, there’s this great blog post I found over that specific question where it goes through the whole process of using the AWS CLI and Mangum.
Second, and maybe the most obvious, I absolutely required my solution to work using FastAPI and Lambda. If you’re willing to switch to a different system, I’m sure there are far more cost-efficient routes you can choose than using FastAPI through Lambda. While FastAPI works great, it also uses Python which has been shown to be up to 12x slower than other popular languages. Personally, I didn’t care so much about the efficiency of the program so much as the efficiency of the development process.
Finally, third, I really wanted this to be server-less. If you are in need of a stateful server, this is not the solution for you. Something like EC2 or Fargate would likely support you a lot better as Lambda is primarily for state-less services that don’t require coordinating between API calls.
If you align with me on all (or any) of these issues or are just curious to read through my whole exploration of the AWS ecosystem, then feel free to keep reading. If not, I recommend checking out some of the links I put throughout the above paragraphs for solutions that may suit you a bit better. If you’re still with me, let’s get to the meat of this page.
Prerequisites
First, for the sake of brevity, I’m going to avoid talking about creating a FastAPI from scratch and assume that you already have your FastAPI up and running locally. If you need a tutorial over creating a scalable FastAPI, I’ll probably get around to writing a blog over it in the future and I’ll make sure to link it here. Until then, here’s where I learned!
Now, let’s say you have something like the example from the link above:
from fastapi import Depends, FastAPI

from .dependencies import get_query_token, get_token_header
from .internal import admin
from .routers import items, users

app = FastAPI(dependencies=[Depends(get_query_token)])

app.include_router(users.router)
app.include_router(items.router)
app.include_router(
    admin.router,
    prefix="/admin",
    tags=["admin"],
    dependencies=[Depends(get_token_header)],
    responses={418: {"description": "I'm a teapot"}},
)

@app.get("/")
async def root():
    return {"message": "Hello Bigger Applications!"}
There are a couple important things to take note of. First, we can notice that we have this object called app which seems to handle all of the routes. When we make a call to our FastAPI using the /docs route while running locally, this is passed through the app and goes to the right route.
The issue is that we aren’t looking for a centralized running service, we are instead looking for a server-less solution. Luckily for us, better programmers than us created a wonderful library called Mangum which handles running ASGI applications on AWS Lambda. To start, all we need to do is install Mangum in our project:
pip install mangumAfter we do this, we just have to make a small modification to our original code to allow our FastAPI to run on Lambda:
from fastapi import Depends, FastAPI

from .dependencies import get_query_token, get_token_header
from .internal import admin
from .routers import items, users

from mangum import Mangum # this line is where we import Mangum

app = FastAPI(dependencies=[Depends(get_query_token)])

app.include_router(users.router)
app.include_router(items.router)
app.include_router(
    admin.router,
    prefix="/admin",
    tags=["admin"],
    dependencies=[Depends(get_token_header)],
    responses={418: {"description": "I'm a teapot"}},
)

@app.get("/")
async def root():
    return {"message": "Hello Bigger Applications!"}

handler = Mangum(app=app) # this line is where we use Mangum
Seems easy enough right? Adding handler = Mangum(app=app) allows us to create the handler object which is able to handle the requests that our Lambda function will be passed internally. And that’s it! We are now done with converting our FastAPI to work on Lambda. As simple as it may seem, running this code as a Lambda function would fully function. Of course, we aren’t done yet as we still have to fulfill the other requirements. Notably, we need this to deploy using a Docker image on AWS Lambda so that we can have even more control over the environment itself.
Containerizing our FastAPI
Now that we have our code running locally on our machines we need to containerize it so that we can build an environment we can run anywhere and everywhere (that supports containers). To start, make sure you have Docker installed on your local machine and readily available from the command line (to see if it is working, simply run docker —version and make sure that it outputs a version).
Next, create a file named Dockerfile in the root of your code repository. This allows us to create Docker images for our repository following the instructions we provide through the Dockerfile file. For this tutorial, let’s start by adding only a couple instructions to create a simple Docker image:
FROM ubuntu:22.04
ARG DEBIAN_FRONTEND=noninteractive
WORKDIR /
COPY . /
RUN apt install -y --no-install-recommends python3 python3-pip python3-dev
RUN pip install --no-cache-dir --upgrade -r /requirements.txt
CMD [ "uvicorn", "main:app", "--host", "0.0.0.0", "-p", "80" ]
(note that we have a requirements.txt file from running pip freeze > requirements.txt or by creating a requirements.txt file manually)
To try this out, simply run docker build -t example_image_tag . to build the current directory’s Dockerfile into a Docker image with the tag “example_image_tag”. Then, once that command is done running, run docker run -p 8000:80 -t example_image_tag . to run the Docker image and map port 80 of the Docker image to port 8000 on our local machine. Now if you go to localhost:8000 in your web browser your should see your API running successfully.
Now we have an issue, however. This is just running the FastAPI normally and is not using Mangum to allow us to run this on a Lambda function. To remedy this, we need to install the AWS Lambda Runtime Interface Client and use it to pass requests into our Mangum handler.
AWS Lambda Runtime Interface Client and Mangum
First, we need to start by installing the Lambda RIC into our Docker image through PyPI:
pip install awslambdaric (make sure to rerun pip freeze > requirements.txt after installing this)
Next, so that we can test this manually, let’s go ahead and create a bash script to handle actually running our FastAPI with Mangum using the AWS Lambda RIC:
#!/bin/sh
if [ -z "${AWS_LAMBDA_RUNTIME_API}" ]; then
  exec /usr/local/bin/aws-lambda-rie /usr/bin/python3 -m awslambdaric $@
else
  exec /usr/bin/python3 -m awslambdaric $@
fi
(personally I called this file lambda_entry_script.sh, but you can call this anything you want)
To continue, let’s add a couple more lines to our Dockerfile to handle this:
FROM ubuntu:22.04
ARG DEBIAN_FRONTEND=noninteractive
WORKDIR /
COPY . /
RUN apt install -y --no-install-recommends python3 python3-pip python3-dev
RUN pip install --no-cache-dir --upgrade -r /requirements.txt
RUN chmod +x /lambda_entry_script.sh
ENTRYPOINT [ "/lambda_entry_script.sh","main.handler" ]
So what do these bottom two lines in our Dockerfile do now? First, we have:
RUN chmod +x /lambda_entry_script.shThis allows us to add the necessary permissions to run our bash script. Then, we have:
ENTRYPOINT [ "/lambda_entry_script.sh","main.handler" ]This line allows us to specify what we do with all the requests coming into our Lambda function. Specifically, it points to the handler = Mangum(app=app) object we created earlier in our FastAPI file. Now we can actually go ahead and deploy our AWS Lambda function for the first time!
Deploying the Lambda Function
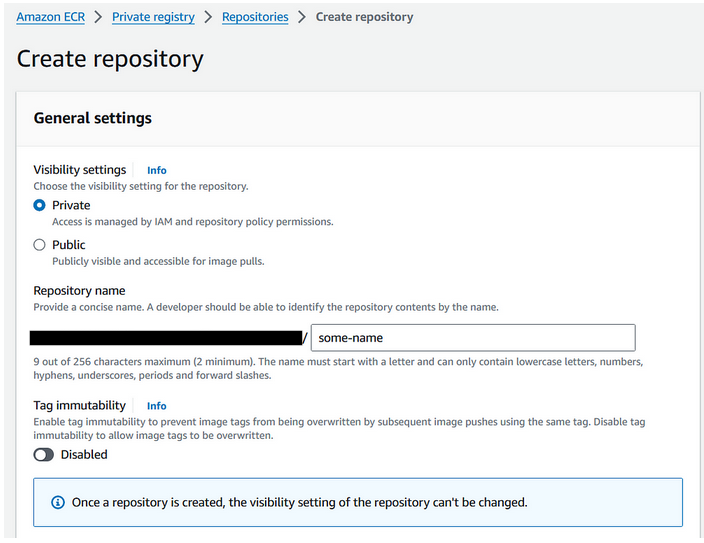
To deploy our AWS Lambda function, we first need to go ahead and upload our Docker image to a new AWS Elastic Container Registry (which is another name for a place to house Docker images). To start, go ahead and create your AWS ECR with the following settings:
Now that we have our ECR created we can go ahead and look at it:
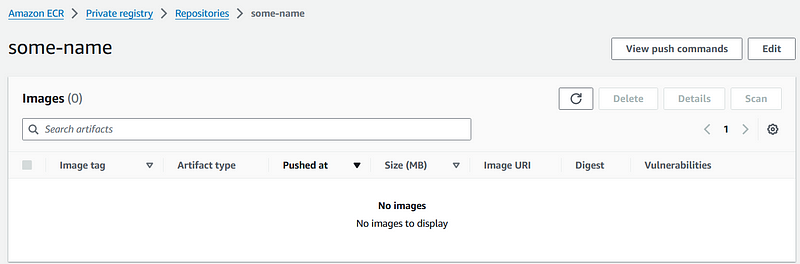
Note the “View push commands” button in the top right. This is going to give us the instructions needed to upload the image we created earlier to our AWS ECR! Simply click the button and follow the steps provided. As a warning, this does require an authenticated AWS CLI (I know this can also be confusing, so if you would like to have a tutorial on authenticating your AWS CLI just let me know). Here are the steps I am shown for pushing to the ECR created above:
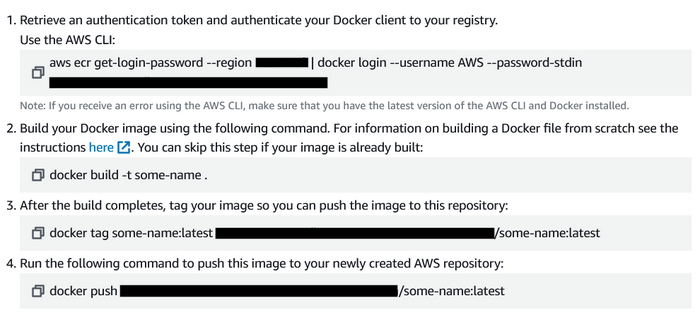
Notice how we have “tag some-name:latest” in the third command? This is specifying the name of the Docker image that we created earlier! Simply replace this with the “-t example_image_tag” you provided earlier when building your image and follow the rest of the steps to upload to your ECR.
Creating the Lambda Function
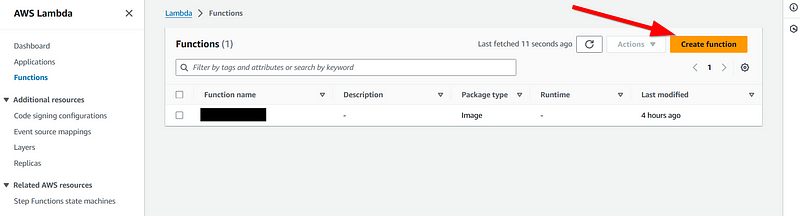
Now that we have our image uploaded, we can go ahead and create our Lambda function. To start, go to the AWS Management Console and go to the Lambda Function center, then click “Create function”.
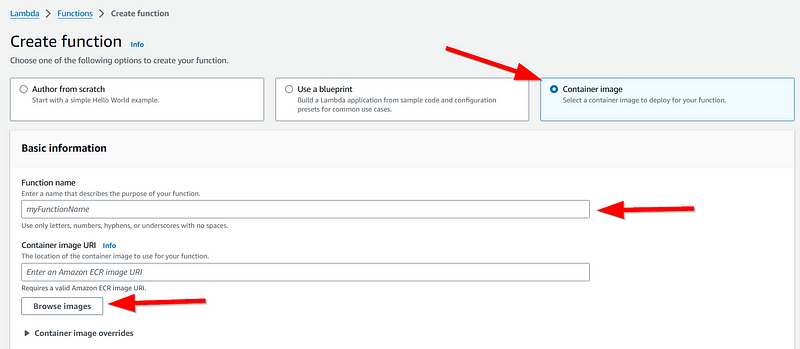
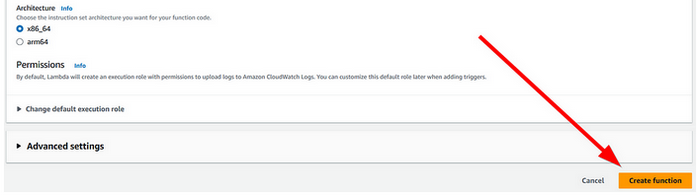
After that a new form will appear. Simply click “Container image”, enter a function name and select our recently uploaded container image using the handy “browse images” button provided. You can leave all other settings the same and go ahead and click “Create function”.
Now go to your newly created Lambda function and modify any settings that you may need to change. For example, if you need to add environment variables then click “Configuration”, “Environment Variables”, and add your required variables.
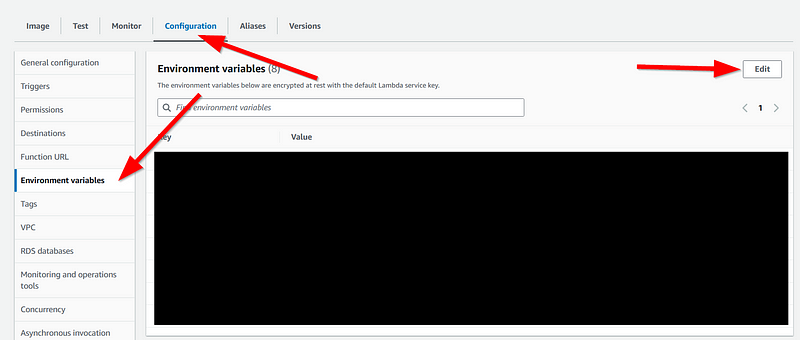
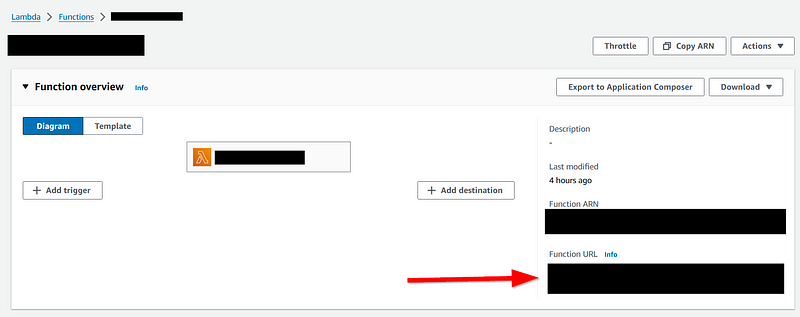
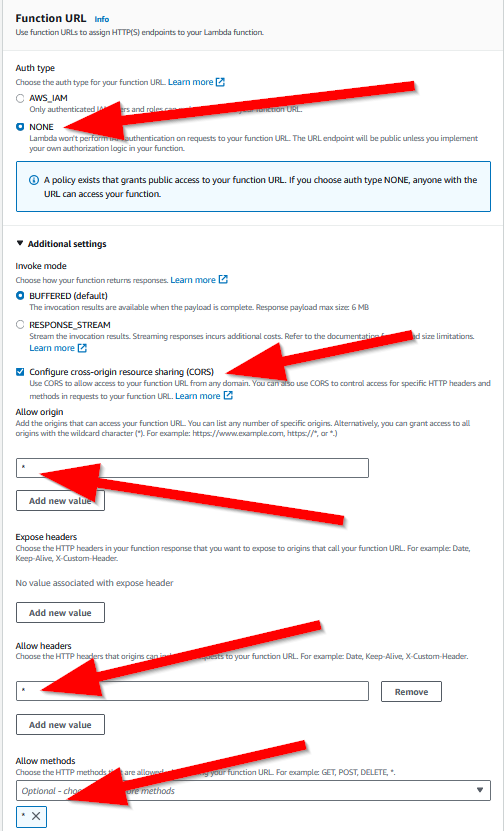
Next, let’s go to “Function URL” and click “Edit” (just like in the above image with the environment variables) to go ahead and create a link where we can test our API. For the sake of this tutorial, I won’t go into setting all the important security settings required for a full production deployment. Instead, I highly recommend you start by using the following settings and then restrict them as needed to secure your API:
Finally, click “Save” and you should see your Lambda function once again. Go ahead and find the “Function URL”, click on it, and then add “/docs” to the end of your URL to see your working API!
If everything went right, then you should now be able to fully use your API server-less from your Lambda function.
Summary / Next Steps
Now that you have a working API deployed on a container image through AWS Lambda, one important step to greatly speed up your development time is automating the process of updating your Lambda function with new images. While it is not a complicated process to do manually, building a complex Docker image can take minutes of time and I’m impatient (especially because of how little RAM my computer has and how much RAM Docker consumes on Windows).
To fix this issue, we need to create what’s called a CI/CD pipeline. This is a process that will allow a virtual machine to run every time you push code to the main repository of your project, allowing us to build the Docker image on AWS itself and then redeploy the Lambda function with the new image.
Of course, just like everything else in the cloud, the whole process of creating a CI/CD pipeline can be much more complicated than what you might expect. Luckily for you, I went through the entire process, and hit every pitfall along the way, of creating a CI/CD pipeline for this exact situation as well. If you’re interested, feel free to let me know and I’ll detail that entire process just like I did this one! Also, if you enjoyed this, please go ahead and leave a clap/comment letting me know what your thoughts were. Since this is my first blog post I’m looking to see what people appreciate/don’t like and would love to refine my future posts.
Good luck coding!
-Nicholas